You will need inFlow On-Premise v3.6 to integrate with Shopify directly. If you would like to get this feature, click here to update now!
If you’ve got a Shopify account and store set up, you’ll need to obtain some information from your admin page before you can connect it to inFlow.
Obtaining your Shopify credentials
- In your Shopify home page, click on Apps at the bottom left, then click Manage more Apps.
- Click Create Private App at the top.
- Set the description to inFlow and click Next.
- This will generate the API Key and Password that you need for inFlow.
Leave this page open so you can refer back to it, you’ll need to copy and paste the API key and Password as mentioned.
Setting up in inFlow
Next, you’re ready to set up the integration! This section requires you to fill in the login details as above and how to connect Shopify’s item names/customers with inFlow’s item names/customers.
Credentials
- Go to the Main Menu > Options > Integrations.
- Click on Activate on the Shopify option.
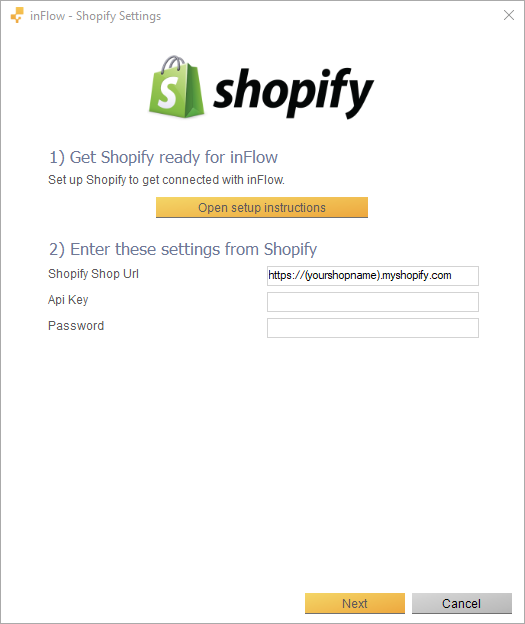
- Fill in your Shopify URL (found in the home page), API Key, and password. Please make sure https:// is in front of your shopify URL.

Which Shopify orders to import
If you’ve already been using inFlow, it’s possible that your orders created in Shopify have already been created as the equivalent in inFlow. So, it’s best to sync new orders only. New Orders only refers to any new Shopify orders as of the moment this setup is finished and you click the sync button.
If you want to import historical orders in addition to new orders (i.e. orders from before you clicked Sync Now), there are two things to watch out for:
First, make sure that your historical orders are not archived in Shopify because inFlow cannot sync archived orders. If you’re not sure how to unarchive your orders then please review Shopify’s instructions for archiving orders, and repeat those steps for any archived orders you have.
Second, within inFlow’s Shopify settings, you can set a specific date (Orders Entered Since) to import all orders since that date.
Please note: this is not advisable unless you have historical inventory levels — importing historical orders while using current stock levels would result in your inventory counts being wrong.
Import orders into inFlow as…
This section covers whether or not the orders you’ve chosen to import above (“New orders only” or “Orders since a specific date…”) are set as Open or Complete.
This really depends on your workflow, for example importing the orders in as Open means you could use inFlow to keep track of any orders that haven’t been shipped yet, and then complete them as you ship out the items. If you’d prefer to import them as Completed to automatically deduct inventory instead of having to manually complete them later, that’s fine too. Please note that this will affect when the orders sync with inFlow. If you set your orders to come in as Open inFlow will sync them when they’re created but if you set them to come in as Completed they will only sync once they are fulfilled in Shopify.
IMPORTANT: If you are importing historical orders as completed and you only have current stock levels, be aware that this will deduct your current inventory levels. It may be best to export your stock levels , import the historical orders as completed, then re-import the stock levels back into inFlow to ensure that you have the correct counts going forward.
When importing products and customers
This section deals with matching up the products/customers in inFlow and the products/customers in the Shopify orders. Note that only products and customers in the imported orders will be synced — not your entire product/customer list!
For example, let’s say you already have products in Shopify, with the Item Name “Blue Shirt Medium” and the SKU “BLS0001M” . If you don’t already have the product in inFlow, and it’s listed on an order, it will be created for you during syncing. You will need to decide if inFlow creates the item using the Shopify SKU, or using the Shopify item name. SKUs are typically unique and it would generally be the better choice.
If you already have products in inFlow, then you need to make sure they match up — for example, if you created inFlow’s item name as “Blue Shirt Medium” and then set the options to import using “Shopify SKU”– you will end up with two separate items in inFlow (even though they are the same product):
- Blue Shirt Medium (original item)
- BLS0001M (item code imported from Shopify)
For inFlow’s Customer Name, you can match it to Shopify’s Company Name, Customer Name, Email, or Customer Name + Email. You can check this information in the “Customers” screen in your Shopify Admin page.
When you’re done, click Next to continue.
Backup
Integrations cannot be reversed once they are synced — so it’s a good idea to backup your data before proceeding! Click the Finish button to have inFlow make a backup. If you’re confident you don’t need a backup, uncheck the box beside Backup your data and click the Finish button.
You’ll be back at the main Integrations screen. Click the Sync Now button to start syncing! You can check back here periodically to see if everything is running well, or just to see when the last sync occurred.

Options
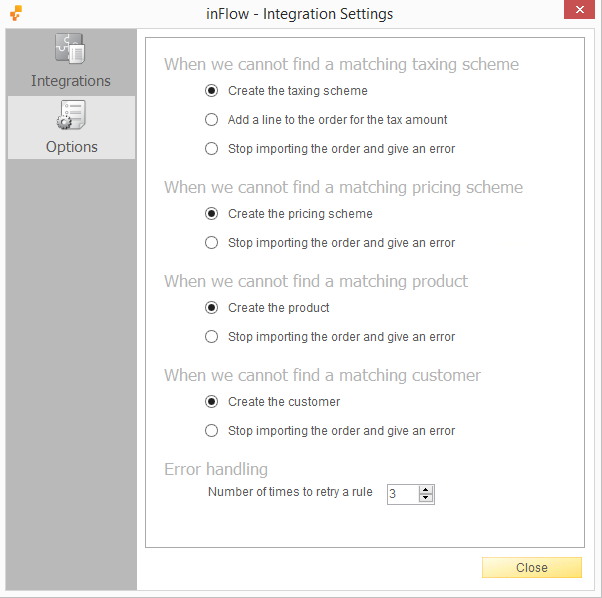
Other advanced options for syncing can control what inFlow does if it comes across information from Shopify that doesn’t match your inFlow data. You can get to this screen by going to the Main Menu > Options > Integrations > Options. Note that the settings in this screen apply to all your active integrations, not just Shopify.
For example, you might not want inFlow to create products automatically as that might lead to duplicates (as in the example above with the Blue Shirt Medium). Here, you can change the setting to “Stop importing the order and give an error” when inFlow cannot find a matching product. You can then compare inFlow and Shopify item names to see why there may be this discrepancy. You can also do this for finding a matching customer, pricing scheme, or taxing scheme.
Still not sure, or looking for more info?
Check out the video tutorial below!


