
You can’t add columns to the order window but what you can do, is add them to the printed documents you’re getting from that order. This is done by capturing the information you’re looking to include in a custom field in the product’s record and then pulling that into a custom document. In the example below we’ve used a sales order and a sales document however the process is the same for a purchasing document.
To add the custom field:
- Go to Main Menu > Settings > General Settings.
- Choose the Custom Fields icon on the left.
- Select the inventory tab.
- Enter your field name(s) under Products (eg. Manufacturer)
- Click Save & Close.
You’ll need to ensure that the information you want to have showing on your document is present in the corresponding product record before you create your order. For example if you wanted to include manufacturer information you would add your custom field with the name “Manufacturer” and then include the manufacturer information in that field in the product record.
To begin creating your document you’ll want to start with one of our sample documents (these are included with your installation).
To open a sample document:
- Go to Main Menu > Settings > Print Settings
- Choose Custom Docs from the icons on the left
- Click the Add New Custom Doc button.
- Choose one of four types of documents (eg. To create a Sales Order document choose Sales Order, Header & Line Items)
- Click Open Sample.
Microsoft Word will open up the sample document so that you can edit it.
If you would like to add additional fields to the document you must first link it to one of the CSV documents provided (available in either C:Program FilesinFlow InventoryCustomDocument or on 64-bit C:Program Files (x86)inFlow InventoryCustomDocument).
To link your sample document to the available order fields:
- Open your sample document as described above.
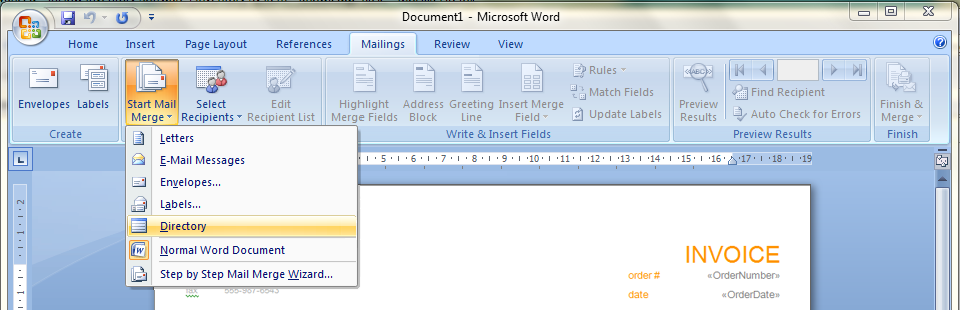
- Click the Mailings Ribbon and choose Start Mail Merge.
- Choose Directory from the list.

- Click Select Recipients and choose Use Existing List…
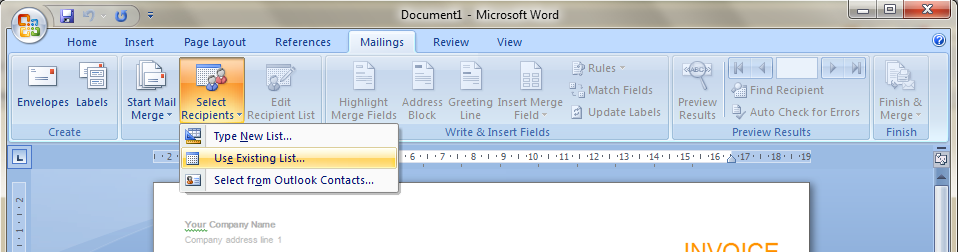
This will open a window in where you can browse to the correct CSV file. There are four available which can be found in C:Program FilesinFlow InventoryCustomDocument (on a 32-bit computer) or C:Program Files (x86)inFlow InventoryCustomDocument (if your computer is 64-bit).

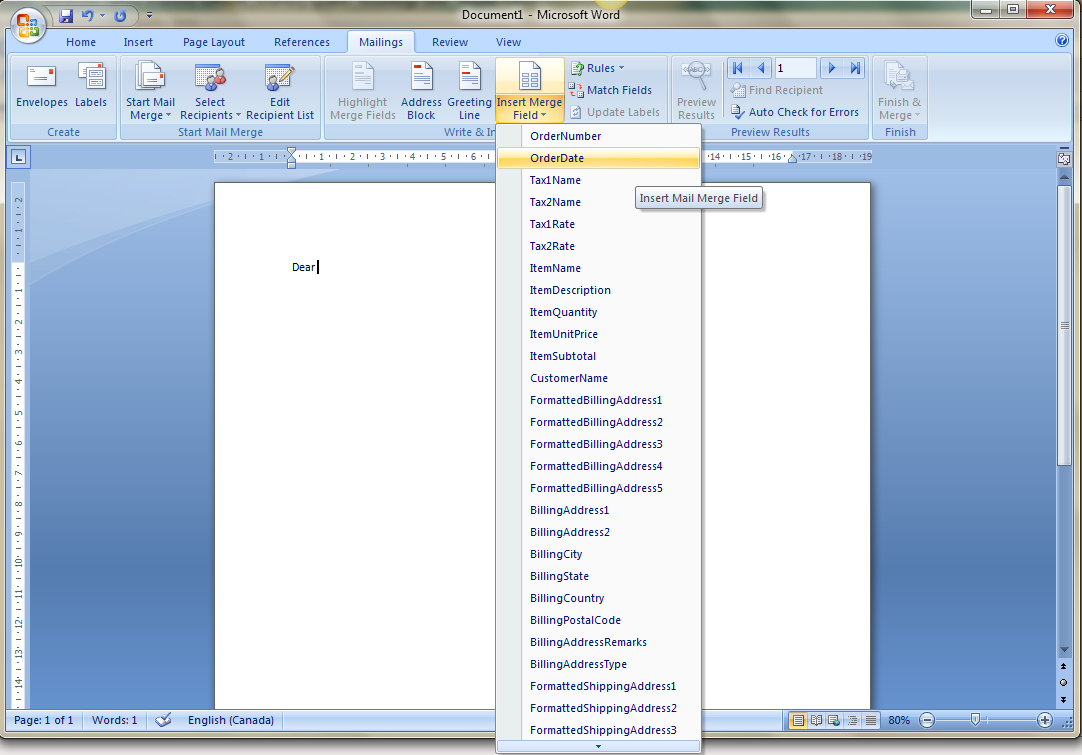
5. You can now insert a new column into the table of the document and then add the available fields via the Insert Merge Field button; there will be a dropdown list of available information. Simply click the field you want to add and a tag will appear in the document. The custom fields are called <>, <>, etc.
Now that you’ve saved the document you can import it into the system. Here’s an example of the finished document with tags.
