
This article is to help you if you are having problems connecting to the inFlow database. Typically, you are likely to receive one of the two common errors received when setting up a connection to the inFlow server in the Server Connection screen.
a) “The Password was not entered correctly.” In which case you should double check the password you are using the connect to the system.
b) “There was an error trying to connect to the database.” In which case you should please proceed with the troubleshooting article below.
A few things to try:
A) Check that network sharing is on, or that you’re on the same network
First, navigate to the “Network and Sharing Center” screen depending on your operating system:
WINDOWS XP / SERVER 2003: not applicable.
WINDOWS VISTA: Go to START > Control Panel > and open the Network and Sharing Center
WINDOWS 7 / SERVER 2008 R2: Go to START > Control Panel and open the Network and Sharing Center.
WINDOWS 8 / 8.1: Hit the Windows key on your keyboard and type in “Control Panel” anywhere on the screen. Click on it, then go to “Network and Sharing Center”.
1. In this screen, the network name listed here must be the same for all computers you’re trying to connect together. The network is the middle icon connecting your computer to the internet (e.g “Network 3” or “WirelessNetwork1”). If it’s not the same, inFlow won’t be able to connect, so you’ll need to change it and reconnect to the same network.
2. Ensure that your network sharing is on on both the SERVER and CLIENT computers. This can be done by following the steps below according to your operating system.
WINDOWS XP / SERVER 2003: Go to START > Control Panel and choose Folder Options (you may have to switch to classic view to locate this icon). In this window click the View tab and make sure that “Use simple file sharing,” is checked.
WINDOWS VISTA: In the Network and Sharing Center and ensure that Network Sharing and discovery is on as well as file sharing.
WINDOWS 7 / SERVER 2008 R2: In the Network and Sharing Center click the Change advanced sharing settings option and ensure that network discovery as well as file and printer sharing are both on.
WINDOWS 8 / 8.1: Hit Windows Key + C to bring up the Charms Bar on the right hand side of your screen. Click the Settings icon and then click your network icon (it should appear at the bottom of the bar now). Once in the “Network” section right-click your network and choose, “Turn Network Sharing On or Off.” You will want to choose, “Yes, turn on sharing and connect to devices.”
3. Windows blocks connections, including inFlow’s, when you’re on a public networks which may be untrustworthy. If this screen is saying your network type is “Public Network”, see below for how to change from public network to “Private network” depending on your operating system:
WINDOWS VISTA/ SERVER 2003: In the network and sharing center screen, click the “customize” link on the right (about midway down the window) and make this connection a Private).
WINDOWS 7 / WINDOWS SERVER 2008 R2: In the network you’ll click the network type to change it to “Home” or “Work” if it says public.
WINDOWS 8 / 8.1: Hit Windows Key + C to bring up the Charms Bar on the right hand side of your screen. Click the Settings icon and then click your network icon (it should appear at the bottom of the bar now). Once in the “Network” section right-click your network and choose, “Turn Network Sharing On or Off.” You will want to choose, “Yes, turn on sharing and connect to devices.”
B) Re-set up multi-user mode, or try a different method of connecting:
1. Try switching your SERVER back to single-user mode. This can be done by going to Main Menu > Settings > Connection Settings and clicking the link at the bottom of the window to “Stop sharing”. Once your copy of inFlow has completed the switch back to single-user mode, try enabling multi-user mode again (Main Menu > Settings > Multi-User Mode).
2. Verify that the inFlow Server Name is correct when entering it on your CLIENT computer. The easiest way to get this information is to log into inFlow from the server computer and select Main Menu > Settings > Connection Settings. The program should show you the server name and password as well as the IP address. Please double check the server name.
3. Try using the IP address instead of the server name when entering it on your CLIENT computer. (as described in the previous step you can get your IP address via inFlow SERVER computer).
4. Make a new connection settings file in case your server’s connection info has changed. To do so, go to the SERVER computer and:
a) Go to Main Menu (top left hand corner) > Settings > Connection Settings.
b) Click to Save Connection Settings and save that file to a flash drive or shared network folder.
c) Return to your client computer and use the connection settings file you’ve created to try and connect to the server.
C) Check the firewall settings or disable antivirus/other connections temporarily
1. If you find that you are unable to change your network type from private to public, access the Windows Firewall screen from your control panel and set the program to be allowed on public networks on your SERVER. This only applies to versions later than Windows XP.
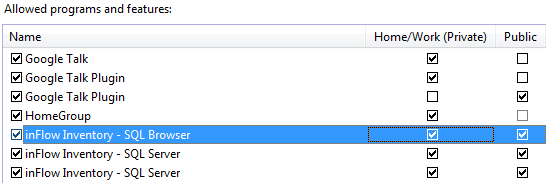
a) Go to Start > Control Panel > Windows Firewall > Allow a program through Windows firewall.
b) Scroll until you see “inFlow inventory – SQL Browser”. There may be multiple instances of this.
c) Ensure that all instances of inFlow inventory are set to “Allow” on “Public”
2. Temporarily shut down any 3rd party networking, file synchronization or database software on both the SERVER and CLIENT computers. Some programs will unexpectedly interfere with inFlow’s communications. In addition to your firewall and anti-virus programs, temporarily shut down any software which fits this criteria on both the server and the client computer.
3. Try temporarily disabling any firewall programs on both the SERVER and CLIENT computers. Your Windows firewall can be found via START > Control Panel > Windows Firewall (in Windows 8, hit the Windows Key + X, and then hit P to bring up the Control Panel). Please also look at the programs you have running in the system tray at the bottom right (near where your date and time are displayed) for other programs to shut down.
4. Try temporarily disabling any anti-virus software on both the SERVER and CLIENT computers. If you are using Microsoft Security Essentials you should find it in your icon tray (bottom right). Double click to open the program and choose the “Settings” tab. Uncheck the first option (“Turn on real-time protection (recommended)”) to turn off the program temporarily. For instance we’ve found that if you have the ESET protection system installed on your computer it is quite resilient in interfering with inFlow connections. To test, try turning it off as above and if that IS the case, please add inFlow as an exception via these instructions.
D) Other Advanced things to try:
1. Manually try restarting SQL Server (INFLOWSQL) and SQL Server Browser services and ensure they’re set to Automatic on the SERVER computer. This can be done by searching “services.msc” in the start menu and running the resulting program. In this window (which is ordered alphabetically) please scroll down until you file the two services mentioned above. One at a time right-click and restart them. They should be listed as “Automatic” but if not please right click and select properties, then change the startup type to “automatic” and click okay.
2. Manually switch SQL Server to allow remote connections by TCP/IP on the SERVER computer. This can be done by completing the following steps first running SQL Server Configuration Manager:
On Windows XP, click Start, Run, and type sqlservermanager.msc.
On Vista or 7, click Start and type sqlservermanager.msc.
On Windows 8, hit the Windows key + R and then type sqlservermanager.msc
b) Then, open up SQL Server 2005 Network Configuration, Protocols for INFLOWSQL. Ensure that Named Pipes and TCP/IP are enabled.
c) Open up SQL Server 2005 Services. Right click SQL Server (INFLOWSQL) and select Restart.
d) Ensure that the SQL Server Browser service is listed and is Running. If not, right click it and select Start.
e) Ensure that both the SQL Server (INFLOWSQL) and SQL Server Browser services are set to start mode Automatic. If not, right click, select Properties, and under the Service tab, set Start Mode to Automatic.
3. Can you see the SERVER computer on the network? Test if you can reach the SERVER computer from the CLIENT computer by pinging it. To do this open a command prompt.
On Windows XP, click Start –> Run –> type “cmd”
On Windows Vista or Win 7 bring up the Start Menu –> type “cmd” –> right click on cmd.exe –> select Run as administrator.
On Windows 8, hit the Windows Key + R, hit A, and then say Yes to the User Account Control prompting your for permission.
Type ping or ping (swapping those placeholders for your actual server name and IP address). If it can’t even resolve it based on the hostname or IP address, then you have a problem with your network setup. (i.e. you get an error message “Ping request could not find host . Please check the name and try again.”) If you get the error message “Request timed out.” then it may still be possible that inFlow can connect. If you get a response that says “Reply from…” then your network is working.
4. Finally, if you’re still having trouble with your connection and you are within the same network, you may still try using Hamachi to accomplish your connection as described in this article: Setting up a VPN to connect inFlow between multiple locations.
